Thursday 27 January 2022

Polar Bear Plunge Blog Hop

The "Polar Bear Plunge" blog hop, is hosted by Joan of MooseStash Quilting. We are to use bears, blue, or anything cold or chilly in our projects.

Living not far from Port Dover, I know what a 'Polar Bear Plunge' is. However, that doesn't mean I will be doing anything like that. I like being warm and cozy too much, to run into the icy cold waters of Lake Erie!

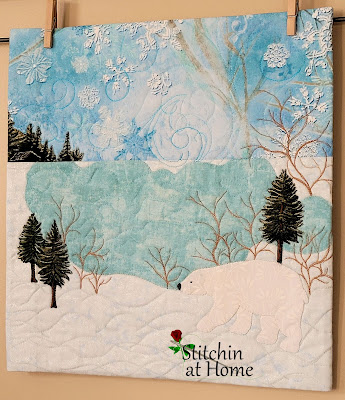
Who doesn't like polar bears though? That is the direction I took with this project.

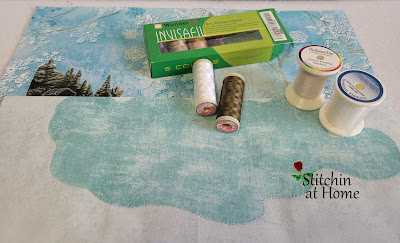
threads I used for stitching down the applique

While doing a little cleaning I found a box of 100 wt Invisafil thread. I like how the thread blended into the applique and didn't take away from it. 

auditioning Aurifil thread for fmqing

I added a few little trees and of course my polar bear. I wish now that I would have used a different fabric to make him from, as I don't think he shows up as well as he could. I used the Crafted Applique method, by Lara for all the applique on this project.

some thread painting on the trees and bushes around the water

I free motion quilted swirls in the sky using Aurifil 4663 a variegated blue, 5007 for the water. For the trees, I used 2026 chalk, 5023 medium green, and the bushes were done with 5010 tan.  

I named this piece 'Serenity', the definition of serenity is being calm and peaceful, and that is what I feel when I look at this piece.

Take a little time and enjoy a cuppa tea as you check out what my fellow blogger's interpretation of a polar bear plunge is.

Saturday 22 January 2022

Project Quilting 13.2 In Silhouette 'Winter~ Spring'

I love these challenges from Project Quilting! They are hosted by Kim of  Persimon Dreams. This week’s challenge was to focus on contrast and design.

Some people enjoy a sense of joy on a snowy day, not I. All that shoveling especially when I got 29cm of the white stuff..yuck. While I was looking for inspiration I came across a quote by Hal Borland "No winter lasts forever; no spring skips its turn." This brings me to my project for Project Quilting 13.2.

drawing of my design in Paint Shop Pro

First I drew an image in my graphics program Paint Shop Pro X9. I liked what I came up with, however cutting all those bits and pieces out was a little daunting. Not to mention that time was also a factor, one week doesn't allow for all that integrate cutting. I may have to invest in a cutting machine at some time in the future.

I had recently purchased some Transfer Artist Paper but hadn't tried it yet. It is transfer paper that you print on your printer (or you can even draw on it) then iron it onto fabric. It is less "plasticky" than other iron-on transfer products and can be used on many other materials besides fabric.

auditioning strips for the background fabric. Winter to the left and Spring colours to the right 


I printed it on the TAP and transferred it to my fabric following the directions included. I wasn't happy with just the printout, I wanted to add to it. I pulled some light scrap stripes and sewed them together. I pieced the TAP piece to the strips and still thought it needed more. But what? The challenge was a silhouette, so I thought, why not a silhouette of a tree?

this is taking shape, now to give it some life via free motion quilting

Next, I layered the top with Hobbs Thermore batting and a backing. I free-motion quilted through all of the layers. I used Aurifil #'s 2692, 2309, and5007. 

after some thread painting of the tree, I am happy with how this piece turned out

I'm looking forward to playing with TAP some more!

The pieces finished at 15 1/2'' x 10''.

Challenge 2 completed!


Saturday 8 January 2022

Project 13.1 'Colour Snippets'

 It's time for Project Quilting hosted by Kim of  Persimon Dreams. The first challenge is called 'All the Colours', we were to use at least 5 colours. At first, I wasn't sure what I was going to make. Then during the middle of a sleepless night inspiration struck of course that was Friday night. Could I do this in one day? Yup!

definitely at least 5 colours

I think I better clarify something, I do not keep pieces this small. What I did was I took small pieces of Steam a Seam Lite and adhered scraps to them then cut those up with scissors.

scraps adhered to small leftover pieces of Steam a seam 

I then dropped the small snippets of adhered fabric to piece of a white fabric scrap. I adhered them to the fabric following manufacture instructions. I then cut the piece below into 2 1/2'' squares.

scattered snippets, the background fabric I used looked like it had snippets of white already

Next, I pulled out some 2 1/2'' HST's from my collection of leftover HST's from various projects.

some of my leftover or bonus HST's

Before you get thinking boy, is she ever organized, to a small extent with these I am. However, I have lots that aren't trimmed and nice and neatly stored.  That's a distant future organization job.


Snippets of colour

Some quick FMQing of sort of concentric circles in the squares with the snippets and arcs in the HST's. I could have done a better job of the arcs in the border. But overall I am happy with how the piece turned out.

I treated myself to flowers on New Years Eve, they still look good

My flowers look good on this piece, it is 9'' x 12''. I used Hobbs Thermore batting which I like to use in table runners and wall hangings and Aurifil #2110 for the quilting. Challenge 1 finished.