Monday 27 February 2017

Sew Much Fun Blog Hop

While reading some Facebook posts on the Craft Your Blog page I came across a blog hop for showing our sewing areas. This was just the impetus I needed to clean up my disaster. I like to be organized and let me tell you my stash had grown and everything was a mess. No organization here what so ever. See for yourself.

yup one big mess and hard to find what I was looking for without having to move lots out first

Everything was stored in a closet on shelves, but my oh my it was a task finding anything in there. The only good thing I could close the closet doors and pretend the problem didn't exist. Off to Ikea to help with my storage problems. I purchased a Kallax  unit. I first sorted out all my FQ's you can read about that here. That left my yardage.

I folded the fabric around a 6'' x 12'' ruler 
Here's how I did it without comic boards, leaves more money for fabric. Open out your fabric and then fold it selvage to selvage edge to make it approx. 22 inches wide. Then fold in half again to make it 11 inches or so wide, by however long your fabric is. Lay out the fabric and place the ruler across it, around 4 or 5 inches from one of the ends.  Fold that end over the ruler, then flip the ruler end over end to wrap the fabric around it until you get to the end. 

neatly folded and yardage marked

I used paper clips to hold the tucked ends in and to also mark the yardage. One paper clip one meter or yard, two paper clips two meters and so on. Now at a glance I know how much is in each little or big folded piece.

neatly folded and stacked
This is only one shelf of fabric, there are more shelves.

I seem to have gathered a few different blacks

FMQ books and thread charts are now at the ready and easy to access


All this makes my heart sing beautiful fabric all neatly organized and stored. At the ready for the next project.


My machine all set for some FMQing. After sending it back in again for servicing, it seems to be working a whole lot better. I'm keeping my fingers and toes crossed that it stays that way.

Is your sewing area all neat and tidy or does it look like my first photo?

The hop runs the week of Feb 27. Here is the list of those participating in the Blog Hop:

1: Jen Frost of Faith and Fabric
2: Raylee Bielenberg of Sunflower Stitcheries & Quilting
3: Tisha Nagel of Quilty Therapy
4: Emily Carroll of Toothpaste and OrangeCat
5: Sherry Smedley of Adventures in Life
6: Emma Wengier of Emkie Designs
7: Anne Beier of Hudson Valley Quilts
8: Eleanor Carleton of Cat Approved Quilts
9: Cindy Pieters you are here
10: Ivete Tecedor of Gotham Quilts
11: Amanda DeYoung Hilldore of Fabric Engineer


Sunday 26 February 2017

Pattern Release God's Eye

I am excited to be able to release my first full pattern. It is called 'God's Eye' thanks to Sandra of mmm!quilts for suggesting the name.


no leaves but the tree branch still makes a good quilt holder

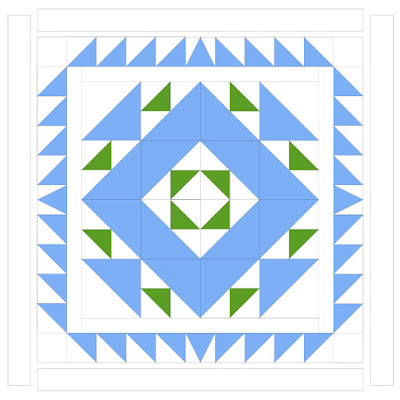
This pattern started as a block design idea that grew. The initial design a 6'' block became the center of the Mini Round Robin from last year. You can read more about that here.


main block of the pattern

I did some dot to dot straight line quilting and curls in the background. I didn't do any quilting except for in the ditch around the green, orange and grey. I did a spiral in the black centers. and loops in the grey squares.

back of quilt 

God's Eye is a paper piecing pattern. The pattern includes cutting instructions for a Baby size quilt, Lap size quilt and Twin size Quilt. It assumes some basic knowledge of paper piecing. The pattern uses six different fabrics including the background fabric.
It is currently $8 in my Craftsy store.

lap size 


Sunday 19 February 2017

This That and the other

It's been a quiet week in the sewing room. I did however take some time to play with my new Neocolor Crayons and also pulled out my Derwent Inktense Pencils.

a fun little flower using neocolour crayons and derwent pencils

I drew up a quick flower and using Clear Aloe Vera gel as a medium. I painted the flower, I just let it flow and had fun. The Quilt Rat has a great tutorial on using Aloe Vera Gel. No idea what I'm doing with the flower yet.

All this playing is before I use either of these techniques on my Guild Challenge for our upcoming Quilt Show June 9 & 10, 2017. 

Guild Challenge
I wanted to highlight some areas of the applique. I will do a post with more photos later, when the project is finished.

charity baby quilt 
My guild has put together kits of donated fabric for quilt tops, I took this one home to work on. Some are panels as this one was, some have strips or bits and pieces of fabric. Tweety was a panel and I bordered it with two other fabrics a lovely green print and a nice yellow floral print. I used a piece of backing from my stash and quilted this one together quickly. I added a couple hearts and stitched in the word love.

can you see the word love?

how about the heart?

 I used some straight lines on the inner borders and loops in the outer border keeping the quilt soft. Added a flange border, this quilt will be donated to Ronald MacDonald House through my guild. 

That wraps up my quilting week in a nutshell. How was your week?

Medallion Quilt Block 2

Another month already it seems like I just posted the last block instructions yesterday. We are going to continue working on the center. Putting it together and adding the borders.

center block


Step 1:

1.Sew the 4 center blocks together that you made last month if you haven't already. See diagram 1a.

diagram 1


Border 1

2-  1 3/4'' X 16 1/2''
2-  1 3/4'' X 19''

Sew the border strips to the center 1a. See diagram 1b above.

HST Border

Medium fabric:        A  16- 3'' x 3''                
Background Fabric: B  16- 3'' x 3''
                                 C  4-  2 1/2'' x 2 1/2''
                             
Step 1:

1. On the back of both piece B draw a diagonal line from corner to corner. See diagram 1a.
2. Place the square on top of piece A. Sew a 1/4'' seam on both sides of the line. See diagram 1b.
3. Cut on drawn line. See diagram 1c.
4. Press HST's open to dark side.
5. Trim the HST's to 2 1/2'' x 2 1/2''
6. Make 32.

diagram 2

Step 2:

1. Sew  four of the HST's from step 1 together. See diagram 3a.
2. Make 4, 3a's.
3.  Sew four of the HST's from step 1 together. See diagram 3b.
4. Make 4, 3b's.

diagram 3

Step 3:

1. Paper piece the four triangle square units, using the medium and background fabric. See diagram 4.
The paper piecing pattern is included in the PDF download.

diagram 4


Step 4:

1. Sew the units 3a and 3b from Step 2 above to a triangle square unit from Step 3. See diagram 5.
2. Make 4.

diagram 5


Step 5:

1. Sew a piece C to each end of one of the units from Step 4 above. See diagram 6.
2. Make 2.


diagram 6

Step 6:

1.  Sew units from Step 5 to the center. See diagram 7.

diagram 7

Border 2

2-  1 3/4'' x 23''
2-  1 3/4'' x 25 1/2''

Sew the border strips to the unit center unit from above. See diagram 8. The center should now be 25 1/2'' x 25 1/2''.


diagram 8

Remember to have fun and to post to Instagram using #stitchinathomemedallion2017 


Sunday 5 February 2017

Meadow Mystery Top Plus Done

On Thursday, Cheryl of Meadow Mist Designs released the quilt top assembly instructions for the Meadow Mystery Quilt, I had all my blocks finished and quickly got to work putting the top together.

meadow mystery top as per the instructions
The top at this stage was 60 1/2'' square. Perfect for my daughter but not for my taller SIL, I needed to make it longer but I really didn't want it much wider. I also had to be cautious of the amount of fabric I had left.

I used my graphics program to help audition some ideas. I decided on a square in a square which were also used as part of the original pattern.

graphic drawing and quilty math

My daughters' favourite colour is blue and I wanted to bring more of the light blue out from the center. Framing the whole piece with the darker blue and using it for the outer pieces of the squares in a square would leave just enough for the flange binding. 

paper piecing pattern for the center extension

I wanted to extend the white part of the top so it looked like it was part of the original design. I made the dark blue borders 2 1/2'' wide and added the white extension. I wasn't sure how my idea was going to look but there was only one way to find out. Make it. I drew up a quick paper piecing pattern for the extension.

dark blue border with center extension
I like how the white looks, extended into the outer border. Next up making 30 square in a square blocks, they were 4'' finished. With the inner border and the square in a square blocks and then a final dark blue border added 16'' to the length. Perfect!

top complete

Next up getting some backing material and then the big question, how to quilt it. I have a couple ideas floating around.

Link ups